| The Linksys PAP2 v2 is a device sold
exclusively through Vonage. A sotware unlock exists for firmware
versions up until 1.00.16 but it's not permanent. The method presented
here works for all firmware versions up to 1.00.22 (current version at
the time when this article was written). You need a serial console cable to complete this unlock method. You will also need this package which contains the firmware files and this package which contains the CYT unlocker tool. First, open the ATA by removing the screw from the bottom of the unit, and the two screws from under the rubber feet on the back of the unit (the ones closer to the top). The front panel will then come off easily. Then, disconnect your main router from the internet, power on the ATA and connect it to your router. Give it a minuted to boot up completely and obtain an IP address from your router. Find its IP address either dialing ****110# from a phone, or from your router's DHCP table. Then, open a browser and login to its web interface with username and password admin and find the firmware version (printed on the upper right corner). If the firmware is 1.00.16 or older, skip to the CYT Unlocker step. If the firmware is 1.00.22, you need to downgrade the firmware first. Change the URL in your browser to ip_address/cgi-bin/firmwarecfg (where ip_address is the address found earlier), chose the file pt-11.4.0-r060628-1.00.16-r060628.img included in the package above and click Update Gateway to program the 1.00.16 firmware. When the update is completed, login to the web interface as admin and verify that the firmware version is 1.00.16. Now, run the CYT unlocker (cyt46.exe) utility. At the Main Menu, choose option 3 to enter the adapter's IP address, then option 1. The unlocker should detect your ATA model. If you get an error here, close the web browser, open it and login to the ATA again, then run the CYT unlocker again. If the adapter is detected properly, hit Enter to start the unlock process. This can take 1-2 minutes. When done, you shuld get a message saying that the Admin user's password has been changed to Admin. You can quit the CYT unlocker now. At this point, the adapter is temporarily unlocked. Now we will change the firmware in order to make the unlock permanent. Connect the serial console to the 5 pin console header shwon below. 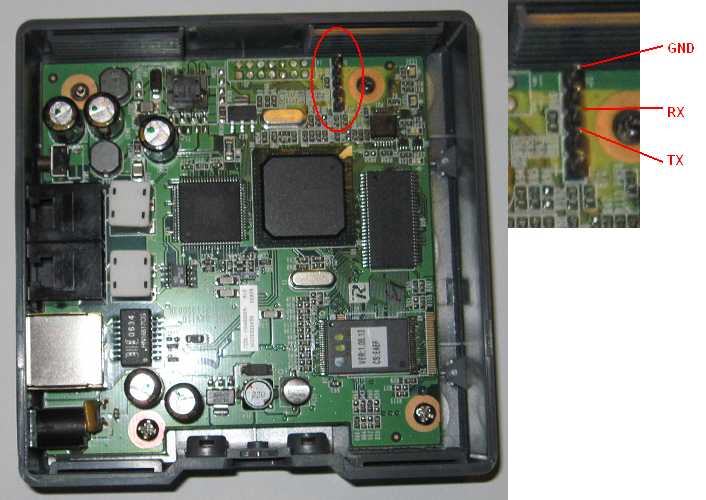 Start the terminal emulation program and connect at 115200, 8 N 1 XON/XOFF and hit Enter a couple times. You should be at the login prompt of the embedded Linux. Login as username Admin with password Admin. Then type the following command: echo "setenv CONSOLE_STATE unlocked" > /proc/ticfg/env This will unlock the serial console so that it can be used during boot. Now, power cycle your PAP2v2 or type the command "reset" in the console. The console should display something like this: Basic POST completed... Success. Last reset cause: Software reset (memory controller also reset) Software reset (memory controller also reset) PSPBoot1.3 rev: 1.3.3.11 ODM rev:2.6 (c) Copyright 2002-2005 Texas Instruments, Inc. All Rights Reserved. Press ESC for monitor... 3 You have 3 seconds to hit the Escape key to stop the router from booting. Now, you are the the PSP Boot loader prompt which allows you to enter commands. First, let's format both image partitions and the configuration partitions: fmt IMAGE_A fmt IMAGE_B fmt CONFIG_A fmt CONFIG_B Then, change the adapter's IP address to be in the same range as your computer but without conflicting any other device in your network. For example if your computer has the IP address 192.168.1.100, and your router's DHCP pool is 192.168.1.100 to 192.168.1.149 you could use 192.168.1.80 for the PAP2v2. This is only temporary, to be able to flash the new firmware through the boot loader functions. setenv IPA 192.168.1.80 Now, let's flash the new firmware. There are two firmware versions included in the ZIP you downloaded earlier: 1.00.22 which is the newest Vonage firmware designed for this ATA, and the 3.1.24, which is a firmware developed by the users of the DSLReports forum from the firmware for the Linksys RTP300 router. My preferred version is 3.1.24 because it has the comprehensive web interface specific to the Linksys/Sipura SPAxxxx series of adapters. However some users have complained about some bugs, such as the IVR that doesn't report the adapter's IP address correctly. You can switch between the two firmware versions to see which one suits you better. However, note that when switching from version 3.1.24 to 1.00.xx, you must adjust some environment variables as well (details in the Note section). Once you decided which firmware to use, start the TFTP server in the directory where you have the firmware files and issue one of the following commands, depending on which firmware version you are loading (replace 192.168.1.100 with your computer's actual IP address): tftp -i 192.168.1.100 pap2v2_1.00.22.img IMAGE_A tftp -i 192.168.1.100 pap2v2_3.1.24.img IMAGE_A Now reboot your adapter. At this point, your adapter is completely unlocked and factory reset safe. If you installed the firmware 1.00.22, the adapter is set to use DHCP and will obtain an IP address from your router. Simply dial ****110# to find that IP address and start configuring it. If you installed the firmware 3.1.24, the adapter is set with a static IP address of 192.168.1.254. To change it, set your computer's IP address to be in the range 192.168.1.x, then login to the PAP2v2's web interface and change the IP address to "Obtain and IP automatically" (DHCP), then power cycle your adapter. You will have to use your router's DHCP table to determine the IP address, because the phone command ***110# will report the address incorrectly. Note: when you first boot the adapter using the 3.1.24 firmware, the flash partition sizes and positions will be changed from the values used by the 1.00.xx firmware. If you wish to switch the firmware from 3.1.24 to 1.00.22, you will first have to reset the size and position of the partitions, using the following commands: setenv IMAGE_A 0x90020000,0x903f0000 setenv CONFIG_A 0x903f0000,0x90400000 setenv IMAGE_B 0x90400000,0x907d0000 setenv CONFIG_B 0x907d0000,0x907e0000 Immediately after that, without booting any firmware, format the IMAGE_x and CONFIG_x partitions again and use TFTP to load the 1.00.22 firmware. -------------- Another way: [PAP2] Unlocking GuideFollow these steps and your Linksys PAP2 will be unlocked. Provider settings do not get erased.Several assumptions: 1. you can get to the WEB interface and set the USER password. 2. Ideally, the device has never downloaded updates, or talked to the provider. 3. You have a TFTP server setup on your network For this example, Assumptions: PAP2 is at ip: 192.168.1.5 TFTP svr is : 192.168.1.110 OK, lets go for it: 1. Put the following two files in the TFTP root folder.This test uses specific firmwares.. These are not for any other use, so if you are looking for upgrade firmware for your PAP2, DO NOT assume that this will be them.. These are for unlocking your PAP2 unit. -------------------------------------------  datarax
I got one from staples and tried it out for testing purposes only of course. My pap2 came without access to the web interface so the instructions on dslreports wouldn't work. However, i found these instructions to gain web access to the pap2 and then was able to unlock the pap2. I prefer to use the sipura firmware and after unlocking it upgraded to sipura 3.1.5. Amazing. Quote:
-------------------------------------------------------------- Cisco PAP2T - PAP2T-NA (Unlocked)
http://www.dslreports.com/forum/remark,14450684 | |||||||||||||||||||||||||||||||||||||||||||||||||||||||||||||||||||||||||||||||||||||||||||||||||||||||||||||||||||||||||||
手机版|小黑屋|BC Morning Website ( Best Deal Inc. 001 )
GMT-8, 2025-12-13 20:00 , Processed in 0.012984 second(s), 16 queries .
Supported by Best Deal Online X3.5
© 2001-2025 Discuz! Team.


