找回密码
 注册

QQ登录

只需一步,快速开始

查看: 1062|回复: 4

Linksys SPA3102 Configuration Guide

[复制链接]
发表于 2012-3-5 09:11:20 | 显示全部楼层 |阅读模式
本帖最后由 Test 于 2012-3-5 09:28 编辑

Device Configuration Guides
Linksys  SPA3102


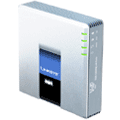
The SPA3102 supports one RJ-11 POTS (Plain Old Telephone Service) FXS  port to connect an existing analog phone or fax machine. The SPA3102  also supports one PSTN FXO port to connect to a Telco or PBX circuit.  The SPA3102 includes 2 100BaseT RJ-45 Ethernet interfaces to connect to  a home or office LAN, as well as an Ethernet connection to a broadband  modem or router. The SPA3102 FXS and FXO lines can be independently  configured via software controlled by the service provider or the end  user.

Installed by the end user and remotely provisioned, configured and  maintained by the service provider, each SPA3102 converts voice traffic  into data packets for transmission over an IP network. Compact in  design, the SPA3102 can be used in consumer and business VoIP service  offerings including a full-featured IP Centrex environment. The SPA3102  uses international standards for voice and data networking for reliable  voice and fax operation.


This device can be used in 3 different ways; Standard VOIP  Line, Local Access Number Line, or both.  We have configuration guides for each  of the 3 ways you may want to configure your device.

Please choose from one of the following 3 configuration guides  that we have available for this device below:
1)      Standard  VOIP Line
2)      Local Access  Number Line
3)      BOTH - Standard  VOIP Line & Local Access Number Line
4)      VoIP to PSTN Setup


 楼主| 发表于 2012-3-5 09:32:20 | 显示全部楼层

Linksys SPA3102 - Standard VOIP Line

Linksys  SPA3102 - Standard VOIP Line


The SPA3102 supports one RJ-11 POTS (Plain Old Telephone Service) FXS  port to connect an existing analog phone or fax machine. The SPA3102  also supports one PSTN FXO port to connect to a Telco or PBX circuit.  The SPA3102 includes 2 100BaseT RJ-45 Ethernet interfaces to connect to  a home or office LAN, as well as an Ethernet connection to a broadband  modem or router. The SPA3102 FXS and FXO lines can be independently  configured via software controlled by the service provider or the end  user.

Installed by the end user and remotely provisioned, configured and  maintained by the service provider, each SPA3102 converts voice traffic  into data packets for transmission over an IP network. Compact in  design, the SPA3102 can be used in consumer and business VoIP service  offerings including a full-featured IP Centrex environment. The SPA3102  uses international standards for voice and data networking for reliable  voice and fax operation.
                                             
STEP 1
Connect one Ethernet cable from your SPA3102’s  ETHERNET port to the Ethernet port on your computer.

*PLEASE NOTE* Do not connect any other cables to the SPA3102  during initial configuration. (Cable/DSL/Router or Analog phone cables)  If  you connect anything other than this one cable, you will not be able to log  into the device.

Now we must determine the address for your device so that it  can be accessed and configured with you browser. To do this, we will need to find out what gateway address  the device has given your computer.

To find the current gateway:
                                
                                WINDOWS XP
                                
  • Click Start
  • Click Run
  • Type CMD and press <enter>
  • Type IPCONFIG and press <enter>
                                In the returned list of information please find the section  labeled LOCAL AREA CONNECTION and write down the default gateway.
                                
                                EXAMPLE
                                Ethernet Adapter Local Area Connection:
                                
Connection-specific DNS Suffix
IP Address192.168.0.2
Subnet Mask255.255.255.0
Default Gateway192.168.0.1


STEP 2
                                  Open up the web browser on the computer that  is connected to the device and enter in the gateway address given to you.
                                 
                                  EXAMPLE
                                  <IPADDRESS>
                                  (where <IP ADDRESS> is replaced by the address that was given to you in STEP 1).


STEP 3
Click on the "Admin Login" button near the top right side of the screen, then click on the
                                  "Line 1" tab.


STEP 4
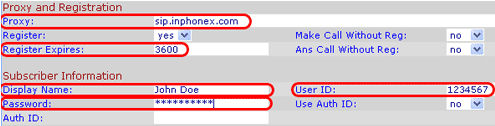
You need to modify only a few parameters from the factory default. They are listed here:


Proxy:
sip.inphonex.com
Display Name:
Enter your full name, this will show up as part of your callerid.
User ID:
Enter the phone number you chose when you signed up for InPhonex service.
Password:
Enter the password that you chose when you signed up for InPhonex service.
Register Expires:
3600
                           
                           
STEP 5
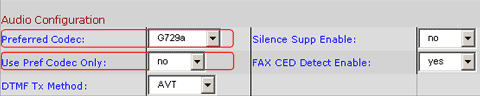
                                  Change the “Preferred Codec” to G729a. Also be sure that  the “Use Pref Codec Only” option is set to NO. You can do this for both Line 1 and PSTN (i.e. if you are going to use PSTN).
                                    
                           
                                                                                          STEP 6
                                    Make calls!

 楼主| 发表于 2012-3-5 09:35:26 | 显示全部楼层

Linksys SPA3102 - Local Access Number Line

Device Configuration Guides
Linksys  SPA3102 - Local Access Number Line

The SPA3102 supports one RJ-11 POTS (Plain Old Telephone Service) FXS  port to connect an existing analog phone or fax machine. The SPA3102  also supports one PSTN FXO port to connect to a Telco or PBX circuit.  The SPA3102 includes 2 100BaseT RJ-45 Ethernet interfaces to connect to  a home or office LAN, as well as an Ethernet connection to a broadband  modem or router. The SPA3102 FXS and FXO lines can be independently  configured via software controlled by the service provider or the end  user.

Installed by the end user and remotely provisioned, configured and  maintained by the service provider, each SPA3102 converts voice traffic  into data packets for transmission over an IP network. Compact in  design, the SPA3102 can be used in consumer and business VoIP service  offerings including a full-featured IP Centrex environment. The SPA3102  uses international standards for voice and data networking for reliable  voice and fax operation.
                                             
STEP 1
                                              Log into your control panel and click on the Local Access  Number Setup button to create a calling card pin for the virtual number you  will be configuring on the PSTN line of this device.
                                              Once this has been setup, continue to step two.


                                  STEP 2
                                    Connect one Ethernet cable from your SPA3102’s  ETHERNET port to the Ethernet port on your computer.
                                  *PLEASE NOTE* Do not connect any other cables to the SPA3102  during initial configuration. (Cable/DSL/Router or Analog phone cables)  If  you connect anything other than this one cable, you will not be able to log  into the device.
                                  Now we must determine the address for your device so that it  can be accessed and configured with you browser. To do this, we will need to find out what gateway address  the device has given your computer.
                                  To find the current gateway:
                                 
                                  WINDOWS XP
                                 
  • Click Start
  • Click Run
  • Type CMD and press <enter>
  • Type IPCONFIG and press <enter>
                                  In the returned list of information please find the section  labeled LOCAL AREA CONNECTION and write down the default gateway.
                                 
                                  EXAMPLE
                                  Ethernet Adapter Local Area Connection:
                                 
Connection-specific DNS Suffix
IP Address192.168.0.2
Subnet Mask255.255.255.0
Default Gateway192.168.0.1


STEP 3
                                  Open up the web browser on the computer that  is connected to the device and enter in the gateway address given to you.
                                 
                                  EXAMPLE
                                  <IPADDRESS>
                                  (where <IP ADDRESS> is replaced by the address that was given to you in STEP 1).


STEP 4
                                  Click on “PSTN Line” Tab.
                                 
                                
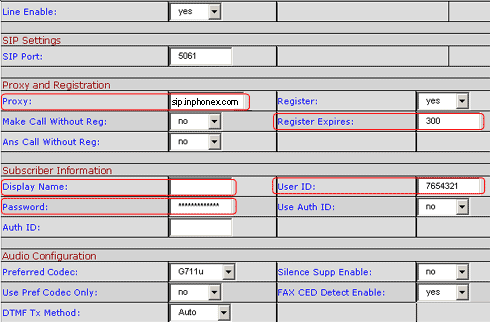
Modify only the circled items of the following:
                                    
Proxy:   
                                  sip.inphonex.com
Register Expires:   
300
Display Name:   
Enter your full name.
Userid:   
Enter the new virtual phone number that you just added to your account, as mentioned in the note above.
Password:   
Enter the password that you chose when you signed up for InPhonex service.


STEP 5
                                  Change the “Preferred Codec” to G729a. Also be sure that  the “Use Pref Codec Only” option is set to NO. You can do this for both Line 1 and PSTN (i.e. if you are going to use PSTN).


STEP 6
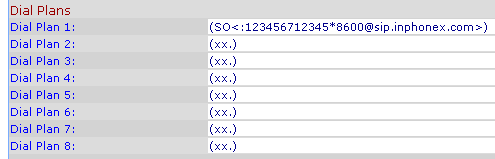
                            Configure Dial Plan 1 as follows:
                            (SO<:xxxxxxxxxxxx*8600@sip.inphonex.com>)
                            Where x  is your 12 digit pin.

                            EXAMPLE
                            For using VN 9609999 with pin 00000 and proxy  sip.inphonex.com the string would look like this:
                            (SO<:960999900000*8600@sip.inphonex.com>)


Step 7
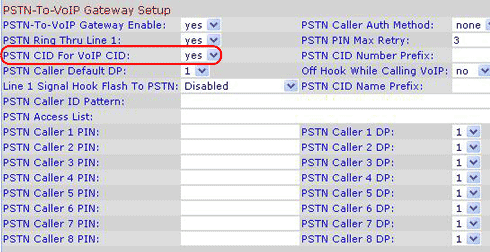
                            Change the "PSTN CID For VoiP CID" setting to YES.


Step 8
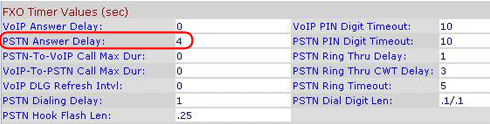
                                  You will need to configure the "PSTN Answer Delay" for one of the following ring delays  of your choice.  This is the amount of time the device will ring before  forwarding the call to the destination number (8600).
                                  1 = 0 Rings (instant forward)
                                  15 = 1-2 rings
                                  30 = 4-6 rings
                                 
                                 
                                  STEP 9
                                    Make calls!

 楼主| 发表于 2012-3-5 09:42:23 | 显示全部楼层

Linksys SPA3102 - Standard VOIP Line & Local Access Number Line

Linksys  SPA3102 - Standard VOIP  Line & Local Access Number Line


The SPA3102 supports one RJ-11 POTS (Plain Old Telephone Service) FXS  port to connect an existing analog phone or fax machine. The SPA3102  also supports one PSTN FXO port to connect to a Telco or PBX circuit.  The SPA3102 includes 2 100BaseT RJ-45 Ethernet interfaces to connect to  a home or office LAN, as well as an Ethernet connection to a broadband  modem or router. The SPA3102 FXS and FXO lines can be independently  configured via software controlled by the service provider or the end  user.
                                               Installed by the end user and remotely provisioned, configured and  maintained by the service provider, each SPA3102 converts voice traffic  into data packets for transmission over an IP network. Compact in  design, the SPA3102 can be used in consumer and business VoIP service  offerings including a full-featured IP Centrex environment. The SPA3102  uses international standards for voice and data networking for reliable  voice and fax operation.
                                             
                                             
STEP 1
                                Connect one Ethernet cable from your SPA3102’s  ETHERNET port to the Ethernet port on your computer.
                                *PLEASE NOTE* Do not connect any other cables to the SPA3102  during initial configuration. (Cable/DSL/Router or Analog phone cables)  If  you connect anything other than this one cable, you will not be able to log  into the device.
                                Now we must determine the address for your device so that it  can be accessed and configured with you browser. To do this, we will need to find out what gateway address  the device has given your computer.
                                To find the current gateway:
                                
                                WINDOWS XP
                                
  • Click Start
  • Click Run
  • Type CMD and press <enter>
  • Type IPCONFIG and press <enter>
                                In the returned list of information please find the section  labeled LOCAL AREA CONNECTION and write down the default gateway.
                                
                                EXAMPLE
                                Ethernet Adapter Local Area Connection:
                                
Connection-specific DNS Suffix
IP Address192.168.0.2
Subnet Mask255.255.255.0
Default Gateway192.168.0.1


STEP 2
                                  Open up the web browser on the computer that  is connected to the device and enter in the gateway address given to you.
                                 
                                  EXAMPLE
                                  <IPADDRESS>
                                  (where <IP ADDRESS> is replaced by the address that was given to you in STEP 1).


STEP 3
Click on the "Admin Login" button near the top right side of the screen, then click on the
                                  "Line 1" tab.


STEP 4
You need to modify only a few parameters from the factory default. They are listed here:


Proxy:
sip.inphonex.com
Display Name:
Enter your full name, this will show up as part of your callerid.
User ID:
Enter the phone number you chose when you signed up for InPhonex service.
Password:
Enter the password that you chose when you signed up for InPhonex service.
Register Expires:
3600
                           
                           
STEP 5
                                  Click on “PSTN Line” Tab.
                                  Note: In order to use the Local  Access Number/PSTN option, you must set up a new (secondary) free Virtual  Number in your control panel.
           
Modify only the circled items of the following:

Proxy:   
                                  sip.inphonex.com
Register Expires:   
300
Display Name:   
Enter your full name.
Userid:   
Enter the new virtual phone number that you just added to your account, as mentioned in the note above.
Password:   
Enter the password that you chose when you signed up for InPhonex service.


STEP 6
Change the “Preferred Codec” to G729a. Also be sure that  the “Use Pref Codec Only” option is set to NO. You can do this for both Line 1 and PSTN (i.e. if you are going to use PSTN).
                           
STEP 7
Make calls!

 楼主| 发表于 2012-3-5 09:45:24 | 显示全部楼层

Linksys SPA3102 - VoIP to PSTN Setup

本帖最后由 Test 于 2012-3-5 09:49 编辑

Device Configuration Guides
Linksys  SPA3102 - VoIP to PSTN Setup


The SPA3102 supports one RJ-11 POTS (Plain Old Telephone Service) FXS port  to connect an existing analog phone and 2 100BaseT RJ-45  Ethernet interfaces to connect to a home or office LAN, as well as an Ethernet  connection to a broadband modem or router.

The SPA3102 FXS and FXO lines can be  independently configured via software controlled by the service provider or the  end user so that any Inphonex user can call their virtual number and place a call  on the local POTS line.


STEP 1
Connect one Ethernet cable from your SPA3102’s  ETHERNET port to the Ethernet port on your computer.
*PLEASE NOTE* Do not connect any other cables to the SPA3102  during initial configuration. (Cable/DSL/Router or Analog phone cables)  If  you connect anything other than this one cable, you will not be able to log  into the device.
Now we must determine the address for your device so that it  can be accessed and configured with you browser. To do this, we will need to find out what gateway address  the device has given your computer.
To find the current gateway:
                                 
                                  WINDOWS XP
                                 
  • Click Start
  • Click Run
  • Type CMD and press <enter>
  • Type IPCONFIG and press <enter>
                                  In the returned list of information please find the section  labeled LOCAL AREA CONNECTION and write down the default gateway.
                                 
                                  EXAMPLE
                                  Ethernet Adapter Local Area Connection:


Connection-specific DNS Suffix
IP Address192.168.0.2
Subnet Mask255.255.255.0
Default Gateway192.168.0.1


STEP 2
Open up the web browser on the computer that  is connected to the device and enter in the gateway address given to you.
                                 
                                  EXAMPLE
                                  <IPADDRESS>
                                  (where <IP ADDRESS> is replaced by the address that was given to you in STEP 1).


STEP 3
Click on “VOICE” Tab.
                                 
                                  Click on “ADVANCED”.

                                 
                                 
STEP 4
                                    Click on “PSTN Line” Tab.

                                 
Modify only the circled items of the following:
                                
Proxy:   
                                  sip.inphonex.com
Register Expires:   
300
Display Name:   
Enter your full name.
Userid:   
Enter the new virtual phone number that you just added to your account, as mentioned in the note above.
Password:   
Enter the password that you chose when you signed up for InPhonex service.


STEP 5
                                  Change the “Preferred Codec” to G729a. Also be sure that  the “Use Pref Codec Only” option is set to NO.
                                    
                           
                            STEP 6
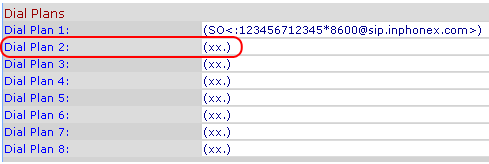
                              Verify that Dial Plan 2 is configured as follows:
                            (xx.)


Step 7
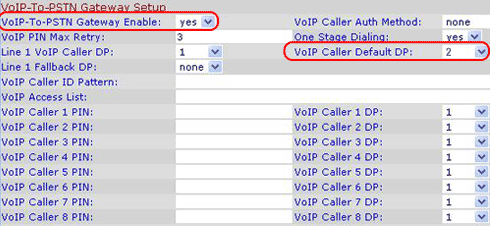
                            Change the "VOIP-To-PSTN Gateway Enable" setting to YES.
                            Change the "VoIP Caller Default DP" to 2.


STEP 8
                                    Make calls!
                           
                           
PLEASE NOTE: When calling into the device from VoIP, you will not hear a dial tone when the PSTN line is ready. Your VoIP phone will show that your call is connected. At that time, dial the number of your choice just as you normally would from your POTS/PSTN phone.

您需要登录后才可以回帖 登录 | 注册

本版积分规则

手机版|小黑屋|BC Morning Website ( Best Deal Inc. 001 )

GMT-8, 2026-5-28 12:16 , Processed in 0.022317 second(s), 16 queries .

Supported by Weloment Group X3.5

© 2008-2026 Best Deal Online

快速回复 返回顶部 返回列表