|
|
Replacing Rear Brake ShoesMost cars have a brake shoe and drum style of brake system in the rear of the vehicle.Drum brakes are not quite as efficient as their counter part the disc brake system. Drum brakes are easily produced and can be used on the rear of a vehicle were only about 30% of the braking is created. Sometimes special brake shoe removal tools are required. Rear brake shoe performance can be affected when wet and the braking ability can be greatly diminished. Before you begin park the car on a level surface, block the front tires to prevent the vehicle from moving. You will be dealing with asbestoses which is a hazardous material so wear protective gloves, clothing and eyewear.
Tools and Supplies Needed to Complete this Job
1. Floor Jack2. Jack stands3. Lug Wrench4. Brake cleaner5. Replacement Brake Shoes6. Brake Shoe Removal Tool
7. Screwdriver set8. Pliers9. Shop towels10. Hammer
InstructionsStep 1 - Identify Rear Brake Shoes and Wheel Cylinder Components

Identify Rear Brake Shoe ComponentsRemove brake drum to inspect brake shoes for wear. If the brake material is less than 1/8 inch, they need to be replaced in most cases. Check thewheel cylinder for leaks. Remove the dust boot from the side of the wheel cylinder and check for brake fluid leaks. If brake fluid is present the wheel cylinder needs replacing. Also check brake shoe hardware, return and mounting springs, and replace if damaged or broken.Step 2 - Removing the Brake Shoes and Wheel Cylinder
Release Rear Brake SpringUse the brake spring tool to remove the return spring to each of the brake shoes.Step 3 - Removing Brake Shoe Mounting Springs
Release Rear Brake Shoe Hold DownsHold the rear of the retainer pin. Insert brake shoe removal tool over retainer clip, press down and twist counter clockwise. Remove spring and retainer. Inspect and replace as needed. Then remove the rear brake shoes and remaining hardware. Match the old brake shoes to the new brake shoes. Both sets should match up exactly. Then transfer hardware to new brake shoes.
Step 4 - Removing Wheel Cylinder
Removing the Wheel CylinderAfter the rear brake shoe and hardware pieces have been removed, install line wrench onto brake line at the wheel cylinder and loosen the mounting fitting, then remove it. Note: brake fluid will leak from line when loosened. Remove wheel cylinder mounting bolts and replace wheel cylinder with new unit. Re-attach and tighten brake lines and retighten wheel cylinder mounting bolts. Then clean and lube the brake shoe backing plate.Step 5 - Reassemble With New Brake Parts

Reassemble with New Brake Part ComponentsReassemble with new brake parts and make sure all the brake hardware is mounted correctly. Note: when changing rear brake shoes, only disassemble one side at a time so you always have a reference copy on the side that is still together.Step 6 - Adjusting Brake Shoes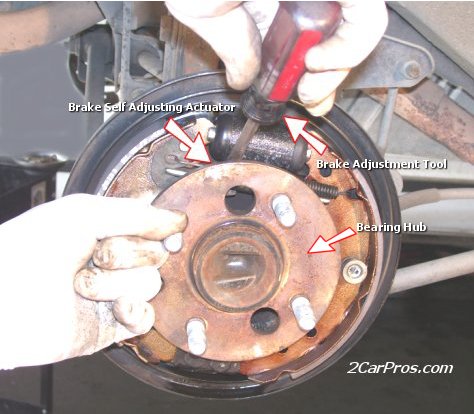
Adjusting Rear Brake ShoesAfter brake shoes have been installed they need to be adjusted. Normally they are self adjusting but the first time after installation, a primary adjustment must be made. After installing the brake drum and spinning it on the bearing hub, adjust the brake shoes to lightly contact the brake drum and recheck regularly. After the brake shoes are adjusted,bleed the brake system until free from air in the brake fluid and leaks. Test brake system before driving.CAUTION: DO NOT DRIVE OR MOVE VEHICLE UNTIL NORMAL BRAKE PEDAL OPERATION IS PRESENT!Common Problems- Brake shoes wear out and grind to metal due to lack of maintenance.
- Low brake pedal due to improper adjustment.
- Looses partial braking ability when wet.
Rear Brake Shoes and Drums | Rear Brake Shoes - The rear brake shoe is actuated by wheel cylinders that force the brake shoe against the brake drum with hydraulic pressure from the master cylinder. |
| Wheel Cylinder - Brake fluid pressure from the brake master cylinder is applied to the brake wheel cylinder forcing the brake shoe against the brake drum. |
| Brake Drum - The brake drum is used to slow the wheel speed through braking action. The brake shoes are applied to the drum to cause friction. |
If further assistance is needed, our certified car repair technicians are ready to answer your car questions. Also, gain manufacturer specific instructions and information by clicking -Auto Repair ManualRelated Car Repair Information
2carpros
|
|

 窥视卡
窥视卡 雷达卡
雷达卡 发表于 2013-7-11 14:08:37


 提升卡
提升卡 置顶卡
置顶卡 沉默卡
沉默卡 喧嚣卡
喧嚣卡 变色卡
变色卡 抢沙发
抢沙发 千斤顶
千斤顶 显身卡
显身卡